Everything you need to know about this creative secret weapon. Plus! Five tips to help you master the Composer Pro!
Why follow the rules of photography, when it’s so much more fun to break them? Lensbaby has the perfect range of tools for any photographer looking to break the artistic boundaries of the photographic world. For giving scenes that added edge of creativity, look no further than the Lensbaby Composer Pro.
Lensbaby optics are perfect for really putting a creative spin on things. With the ability to swap interchangeable optics in a lens, such as Soft Focus, Pinhole, and Plastic, the possibilities for creating unique scenes is endless. The Composer Pro is specifically built for creative photograhers who really like to make scenes their own with their own expressions.
We’ve given the Composer Pro with the standard Double Glass optic a place in our gear bag to see just how well this lens really works. Much like a Fisheye or Macro lens, the Composer Pro gives photographers a whole new perspective with which to view the world.
Who is it for?
The Composer Pro is perfect for photographers who love to have fun with their work. The lens appeals to those who love to change their perspective, snap unique captures, and see how far they can take their creative freedom. Whether you are professional, hobbyist, or anything in between, you can definitely enjoy the Composer Pro.
HARDWARE
The Composer Pro feels sturdy in hand, as the plastic body feels solid, and the two focal and locking rings are a nice, grippy rubber that makes adjustments easy to make. The focusing action, though strictly manual, is smooth. There may be a minute amount of fidgeting towards the nearest focusing distance and infinity, but this depends on the optic being used, and never posed any sort of issue for us.
The 2nd ring on the Composer Pro locks the focal plane into place. After unlocking the ring, the lens can be shifted and tilted in all directions. Tightening the ring will lock the lens in its position.
The Composer Pro, with metal mount, fits our Nikon D90 like a glove. The reference dot for lining up the lens is on the bottom of the Composer Pro, right on the metal mount. There are no reference points on the sides of the lens, which can make mounting the lens a bit difficult sometimes. The trade-off for this is that the Composer Pro does look more sleek and streamlined once it is mounted to the camera, as it is free of any extraneous markings and labels.
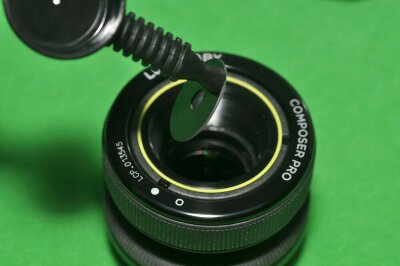
Lensbaby Optics make use of a specialized tool to change manual aperture rings. This may be a nuisance at first glance, but is actually one of Lensbaby’s strongest assets.
Lensbaby Optics use their own unique lens caps. These caps are solid, springy, and feel quite tough once they are in place. This is a blessing, since replacing a lost cap won’t be as easy as it would be for a standard cap.
Changing optics is actually quite easy, and with a few minutes practice, can be done in a just a few seconds. The Optics contain the glass through which the image passes, while the Composer Pro is the outer shell that mounts the Optic to the camera body. There are many Optics to play with, and many of those Optics allow the use of Creative Aperture Filters. We’ll cover more on that shortly!
PROs
Create your own, unique focal planes. Make grand scenes look like miniature play sets. Make every scene your own creative playground. The Composer Pro lets photographers stretch their wings of artistic expression and take their photography to a whole new level. Don’t just capture scenes. Create them!
The Composer Pro is solid, streamlined, and unique. It pushes creative boundaries and opens up a whole new playing field for photographers. While it may seem like a crazy, cooky concoction of a scientific experiment, it simply works wonders.
If you’re looking for a new way to have more fun with your photos, the Composer Pro fits the bill just right. Once we picked up this sweet lens, we couldn’t put it down. With a constantly growing selection of interchangeable Optics and Bokeh Filters, there’s enough to make a photographer feel like a kid in a candy store! Lensbaby’s selection of Optics and mounts literally lets photographers “do what they want”.
The rule bending focal circle of this optic allows for brilliantly unique photos that are simply not possible with any other lens. With miniaturizing and zooming effects, the Composer Pro is one hot customer. The possibilities for synthesizing creative effects is endless.
Lastly, one of the greatest yet immeasurable qualities of the Composer Pro is that it really does incite photographers to challenge themselves and extend his or her creative limits. The first time we took this lens into the field, we were excited yet a bit lost as to what we should do with the lens. However, on our third or fourth outing, we found ourselves really searching and framing some truly interesting scenes. Any tool that helps photographers improve their physical game, and their mental game as well, is a winner in our book.
CONs
One of the first things that really strikes an odd note with the Composer Pro with the standard Double Glass Optic is that this lens requires the user to manually change aperture rings. What does this mean? Simply put, instead of turning a dial on the camera body, or letting the camera automatically manage the Aperture, the user must use a magnetic tool to reach into the lens optic, pull the lens out, and replace it with a different one.
This can be rather frustrating and time consuming for new users. In fact, taking this lens straight out into the field, without practicing at home first, was one of the worst ideas we’ve ever had. We found ourselves fumbling around on a windy day, struggling to juggle a number of aperture rings and get them to stay in the optic properly.
With a bit of practice, within a week, we had the technique for swapping Aperture Rings down to an art- to some degree. However, the unforgiving nature of the manually changed aperture rings seemed to be a mere shadow at the feet of the Composer Pro’s roughest aspect.
The Composer Pro simply has a high learning curve, and all of our early experimental shots were about as pretty as Sunday night’s rubbish. The Composer Pro with Double Glass optic has a seemingly ever changing focal plane. Things out of focus tend to smear, and Point Light Sources come out with a decidedly undesireable bokeh.
However, the Composer Pro’s weaknesses actually turn out to be the most valuable creative assets! With patience and practice, the Composer Pro can easily become a vital tool in a photographer’s arsenal. After running around beaches, bushland, and soaring through the sky, we’ve compiled the best five tips to help you master shooting this lens!
Tip # 1 – Start Small
While it may be tempting to take a brand new Composer Pro straight out into the field, it’s a good idea to start at home. There is quite a bit of information to keep in mind when shooting the Composer Pro. The best way to figure out the characteristics and little tricks of any new lens is to start at home, and start small. Take your time to figure out how to adjust the focusing ring and focal plane adjustment without having to pull the camera away from your face to look at it. The biggest difference between the Composer Pro and a conventional optic is the shape and nature of the Focal Plane. Have a look at the following diagrams to see the differences.
A Conventional optic captures scenes with a linear focal plane. It flows horizontally flat from left to right with even distribution across the scene.
The Composer Pro makes use of a round focal plane. Due to the shape and nature of the Composer Pro, the area of focus in a scene is actually circular. This gives scenes a wonderfully unique perspective that dangerously teeters between fantastic and undesireable. The best way to avoid capturing blurry disasters is to gain a strong understanding of the nature of the Composer Pro.
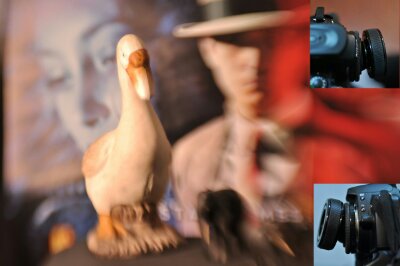
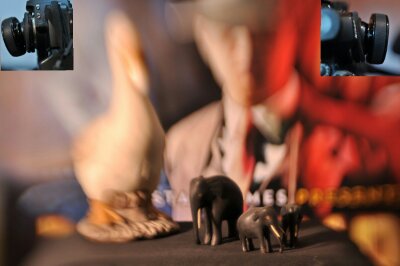
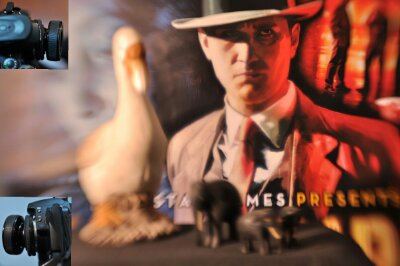
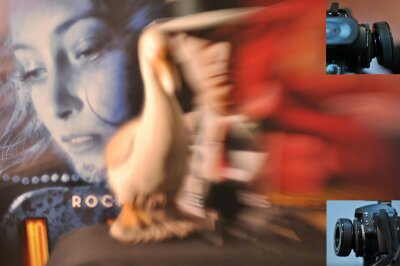
To quickly get a hang of things, try setting up a few small subjects on a table with controlled lighting and a flat background. Set the camera on a tripod and maintain a consistent framing. Practice moving the focal circle around the scene by adjusting the Composer Pro optic. In the images below, the diagrams indicate how to attain each desired effect.
Controlling the focal circle is quite simple. To move the focal circle to the right of the frame, tilt the Composer Pro optic to the right. To move the focal circle upwards, tilt the Composer Pro optic upwards.
Check out these reference diagrams. To set the focal circle to the upper left of the frame, tilt the Composer Pro upwards and left.
To set the focal circle to the bottom right of the frame, tilt the Composer Pro downward and to the right.
Shift the focal circle to the top right corner of the frame by, you guessed it, tilting the Composer Pro upwards and to the right.
Sensing a pattern yet? Move the focal circle to the left by keeping the Composer Pro elevation level and tilting to the left.
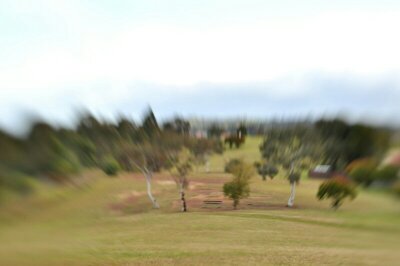
The Composer Pro does not simply “blur” things out. It actually “stretches” the portion of the scene outside of the focusing range. This characteristic resembles a zooming effect and can be a blessing or a curse. This brings us to our next, and vital tip.
Tip # 2 – Watch Out For Point Light Sources
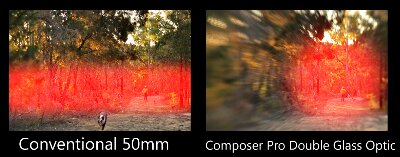
One of the Composer Pro’s most identifying qualities is the way the optics stretch and pull the areas of the scene outside the focal plane. What does this mean, exactly? In a conventional lens, something “out of focus” is simply blured. With the Composer Pro, parts of the scene outside of the focal circle are “stretched”. The farther from the focal circle we get, the more stretching we see.
This stretching can often lead to undesired distortions that seem to distract and detract from the subject of the scene. This is most apparent and important when Point Light Sources are caught outside the focal circle. Anything like a light bulb or a spot of light peaking in through tree branches can become an unwiedly streak of light.
For the most part, it would be wise to avoid Point Light Sources when framing a scene. At the very least, be aware of the point lights and keep in mind that it is vital to manage those lights in the scene. However, if those rascally stretchy light just won’t go away, zip on over to our next tip!
Tip # 3 – Use Aperture Rings
It’s common knowledge that when life gives you lemons, you should make lemonaid! And what happens when life gives you a lens which uses external aperture rings that must be manually changed? The answer is simple! Use special Creative Aperture Filters to kick your creative freedom up a notch!
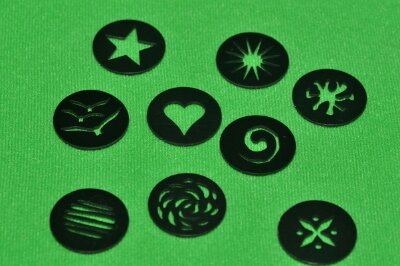
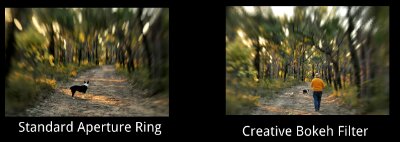
Creative Aperture Rings are most commonly used to change the shape of out of focus Point Light Sources in a scene. Usually, obvious shapes such as hearts and stars are employed in this fashion. However, we can do much more than that! In the case of the Composer Pro’s smearing and stretching Point Light Sources, the use of just the right Aperture Filter can turn a distorted scene into an artistic one.
As a basic function, you can mask unsightly stretched bokeh with creative aperture filters. To add to that, you can also gain an enlightening level of control over the composition of the scene with these filters.
Creative Aperture Filter Rings can be used to infuse scenes with various effects, such as paint brush strokes or even a more natural looking branch-like pattern. There’s a wide range of Aperture Filters to try out, and even more interchangeable optics to combine with those filters to create some truly unique scenes.
Tip # 4 – Shoot From a Great Height
The Composer Pro stands in a class all on its own. However, it can be closely compared to Tilt Shift lenses. Tilt Shift lenses can move a scene’s focal plane while remaining linear (a straight line, as opposed to a circular area). Tilt Shift lenses are most notably used to make big scenes look like a miniature playset. The Composer Pro can achieve similar results with some thoughtful planning and favorable conditions!
The best way to achieve this miniaturizing effect is to gain height. Taking a shot through a window of a hotel room on the 24th floor, or through the window of a helicopter allows photographers to turn the world below them into a delightful playset of children’s figurines.
Again, it’s vital to make use of aperture rings to stop down and minimize stretching effects. It also helps to minimize shifting of the focal circle within the frame.
Tip # 5 – Use a Strong Subject
Captures taken with the Composer Pro entice viewers to focus their sights on one particular subject in the scene. The best way to take advantage of this characteristic is to frame a scene with a strong subject. The worst way to shoot the Composer Pro is to not place an obvious subject within the focal circle. Have a look at the follow examples.
If we are missing a subject to focus our eyes on, our scene falls apart
The focal shape of the Composer Pro with Double Glass Optic pushes the viewer’s eyes to look at one thing out of the whole scene. However, if there is nothing there, the viewer can be confused. “What am I supposed to look at?” “Is there something there?”
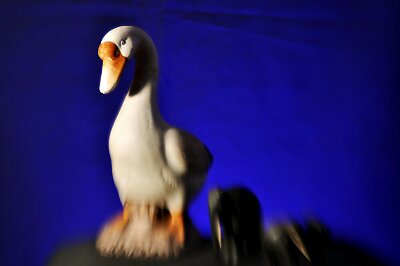
Scenes with a strong subject really allow the Composer Pro to shine.
By placing an obvious subject within the focal circle of the frame, photographers can make the most the Composer Pro’s focal plane shape. The best part about this is that the Composer Pro allows photographers to shift the focal circle to any position in the frame. Experiment and see what you can come up with!
To sum things up, we love Lensbaby’s Composer Pro. There is a distinct air of sophistication and artistic freedom that is difficult to find with any other optic. There is a steep learning curve when it comes to achieving satisfying results with the lens. Take this as a challenge, because once you get the hang of it, you will find yourself taking grand creative strides with your photos, and you will be rewarded.
Tune in next time, as we cover some great Lensbaby Optics to use with the Composer Pro, and more tips on taking your creativity to the next level!
For more tips, techniques, and hands on time with cool camera gear, check out the upcoming The Digital Show Expo in Melbourne, VIC!
Click to register for free entry!
Happy Hunting!
Jerrel Dulay
















Leave a comment